![]()
![]()
![]()
Web Hera
Main Interface
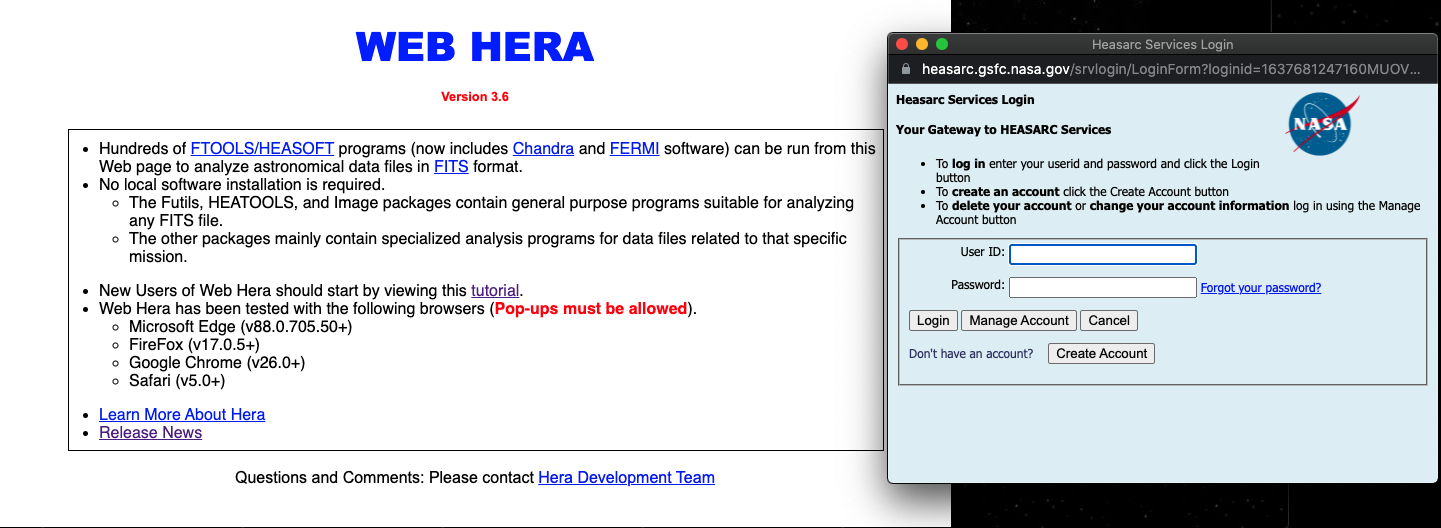
Once
an account has been activated, user can now go to main login panel and log onto
Hera system. To start the login process, point web browser to http://hera.gsfc.nasa.gov/webHera
and fill in values for user name and password values selected during
registration.
Once
successful logging into Hera, Hera system will present user with the main
interface of Hera. The main interface consists of User Action, Interface Info
Toggle, User Current Working Directory, Tool Parameter and Tool Output panels.

|
|
|
Interface
Info Toggle Panel
|
|
|
User Current Working
Directory Panel
User current working directory panel consists of list of
directory and files of user Hera data. From this panel, user can view his own data
files, create sub directory, upload and download data files, delete or rename
data file/directory.

Click on any folder name to go inside the folder.
|
|
or |
|


displays the current viewing and working directory for the
selected tool.
|
|
|
|


Icons
on the User Current Working Directory Panel
|
Icon |
Meaning |
|
|
Create a new directory in current
working directory. |
|
|
Go to the home directory on user’s
Hera account. |
|
|
Go UP one directory level |
Action
to perform on Directory or File
To perform an action on a directory or a file, move the
cursor onto the icon next to file/directory name to bring up action panel.
Action on a directory

Action on a file

|
Icon |
Meaning |
|
|
Display Fits header info and table
contents |
|
|
Download the selected file |
|
|
Open the directory |
|
|
Rename the file/directory |
|
|
Delete the selected file/directory |
Tool Parameter Panel
Tool Parameter Panel displays the parameter editor for user to
select input file, input parameter value(s) for selected tool.

Tool Input Panel
![]()
Type in name of the
name of the task, the system will populate the Parameter Panel with the task’s
parameter values.
Icons
on the Parameter Panel
|
Icon |
Meaning |
|
|
Click to display help on the tool |
|
|
Click to run the tool (for example, “ftlist”) |
|
|
Click to run the tool without wait
for result (for example, “ftlist”) |
|
|
Click to update inputted parameter
values to system. |
|
|
Click to reset parameter values to
system defaults. |
|
|
Click to minimize the panel. |
|
|
Click to maximize the panel. |
|
|
Input a new task name and change to
the new parameter file. |
|
|
Bring up available task list |
Tool panel organizes the available
FTOOLS software into Mission Category. User can click on any one of the
available category to expand it. Panel.

|
Icon |
Meaning |
|
|
Dismiss
the Help panel. |
Click on a tool in the Tool List Panel or input task name on the
Tool Input Panel will display its parameters and default values in Tool
Parameter.

Click on ![]() to bring up help on the task.
to bring up help on the task.

|
Icon |
Meaning |
|
|
Dismiss
the Help panel. |
Command Window
Terminal
Command Window Terminal displays the output from the tool and also allows
user to type in and submit command or interact with tool currently running.

Icons
on the Command Window Terminal Panel
|
Icon |
Meaning |
|||
|
|
Click to minimize the panel. |
|||
|
|
Click to maximize the panel. |
|||
|
|
Help on the Command Terminal
Interface. The help text will show up in a web page (see here.) |
|||
|
|
Decrease text size in the Command
Terminal Interface |
|||
|
|
Increase text size in the Command
Terminal Interface |
|||
|
|
Expand to. |
|||
|
|
|
Font family selection (see example.) -
Click on drop down
arrow to select different font. -
Click on box next to
“Bold” to select bold font. |
||
|
|
|
Font
color selection (see example.) -
Click on drop down arrow next to “Text” to select
different color for text. -
Click on drop down arrow next to “Background to select
different color for background. |
||
|
|
Dismiss
current selection |
|||
|
|
This provides a simple way for user
to save/print output (see example.) |
|||
|
|
Adding a new output window. |
|||
Command Window
Terminal
|
|
One default Command Window Terminal
exists when Web Hera starts. User has the option to add more
Command Window Terminal by clicking User can select any terminal by
clicking on any area of the terminal. User can run different task(s) at any
selected terminal. |
|
|

Example of Save|Print Output
At
current development stage, saving to Windows platform is automatic. But on UNIX
or Mac OS X, the only way to save or print contents in Command Window Terminal
is to use default browser print/save function. By clicking on the ![]() button, the contents inside the Command Window
Terminal would be dumped to a browser page. User could then use browser
printing/saving capability to print or save the contents.
button, the contents inside the Command Window
Terminal would be dumped to a browser page. User could then use browser
printing/saving capability to print or save the contents.
|
|
|
|


Example of Change Text Font (Arial font
and Bold)
|
|

Example
of Change Text and Background Color (Green text and Black background)
|
|

![]()
![]()
![]()